Removing the Drive Shaft
IMPORTANT INITIAL STEP
You must first raise the vehicle up using a lift, floor jack and jackstays. When a drive shaft is removed the vehicle will no longer be in park and can roll because the link between the drive wheels and transmission is removed. Also always wear protective eyewear and gloves before you begin.
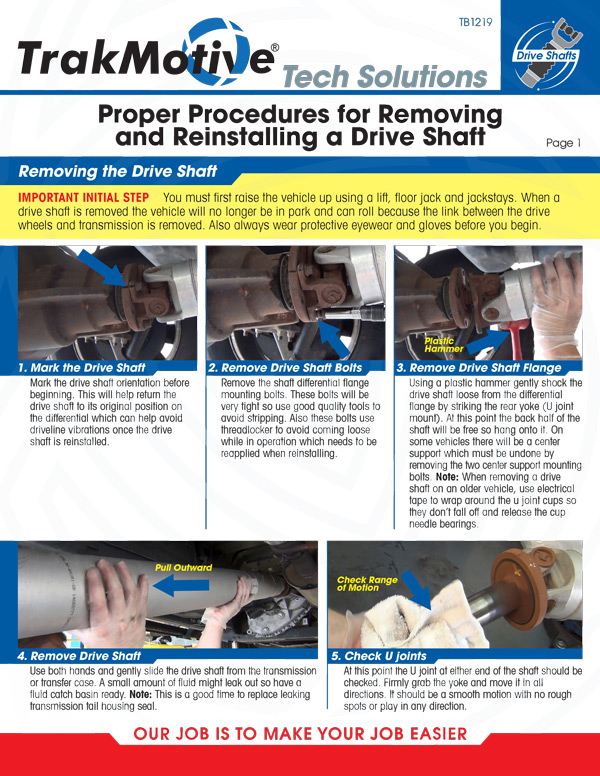
1. Mark the Drive Shaft
Mark the drive shaft orientation before beginning. This will help return the drive shaft to its original position on the differential which can help avoid
driveline vibrations once the drive shaft is reinstalled.
2. Remove Drive Shaft Bolts
Remove the shaft differential flange mounting bolts. These bolts will be very tight so use good quality tools to avoid stripping. Also these bolts use threadlocker to avoid coming loose while in operation which needs to be reapplied when reinstalling.
3. Remove Drive Shaft Flange
Using a plastic hammer gently shock the drive shaft loose from the differential flange by striking the rear yoke (U joint mount). At this point the back half of the shaft will be free so hang onto it. On some vehicles there will be a center support which must be undone by removing the two center support mounting bolts. Note: When removing a drive shaft on an older vehicle, use electrical tape to wrap around the u joint cups so they don’t fall off and release the cup needle bearings.
4. Remove Drive Shaft
Use both hands and gently slide the drive shaft from the transmission or transfer case. A small amount of fluid might leak out so have a fluid catch basin ready. Note: This is a good time to replace leaking transmission tail housing seal.
5. Check U joints
At this point the U joint at either end of the shaft should be checked. Firmly grab the yoke and move it in all directions. It should be a smooth motion with no rough spots or play in any direction.
Installing the Drive Shaft
IMPORTANT INITIAL STEP
You must first raise the vehicle up using a lift, floor jack and jackstays. When a drive shaft is removed the vehicle will no longer be in park and can roll because the link between the drive wheels and transmission is removed. Also always wear protective eyewear and gloves before you begin.
6. Reinstall Drive Shaft
A. Before re-installing the drive shaft, apply a small amount of grease to the yoke. This will help lubricate the output shaft seal in the transmission or transfer case.
B. There is a dust boot along with the rear seal which is incorporated within the transmission or transfer case tail housing seal. The transmission or transfer case output shaft is where the drive shaft connects.
C. Be careful when reinserting the drive shaft yoke so you do not damage the seal. Gently guide the yoke into place over and onto the output shaft.
7. Reinstall Flange Bolts
A. Once the front yoke is installed pull the drive shaft back into place while inserting a mounting-bolts by hand to avoid cross threading. Finish installing the mounting bolts while making sure the alignment marks are together.
B. Tighten the bolts evenly and in a cross pattern to factory specs which is usually 55-65 ft. lbs. of torque (make sure to verify the torque specs in the owners manual). If any fluid was lost during the job, check and refill the transmission or transfer case after the shaft has been reinstalled and you are all set.

